


Component Installation
This package contains multiple files for installing various elements of this registration solution. The main component and primary modules/plugins are installed together as a package. The remaining items that are separate are all optional and you can install the ones that you want or need. To install the DT Register package, locate this file in the group of extracted files that you unzipped from your download package:
- DTRegister3_3_1_PKG_J3x.zip
- Google Export Import Plugin(optional)
In the Joomla admin, go to Extensions -> Extension Manager -> Install. If you already have a previous version installed, you do NOT need to uninstall it first. See upgrade instructions below. Otherwise, simply install this package by clicking the "Browse" button to locate the install file on your computer. After locating it, click "Upload & Install". You should see a successful installation message. For further assistance, see our video tutorial for Installation.

Component Configuration
DTH Register use default settings for the confiugration, This section will help you to apply the demo site configuration
Categories
This section is used to create and manage the event categories, It will allow you to create new categories that allow you publish the event in different category group and access level

DTH Configurations
This section contains all the configuration need to by apply to setup the component, in demo we used default configurations.
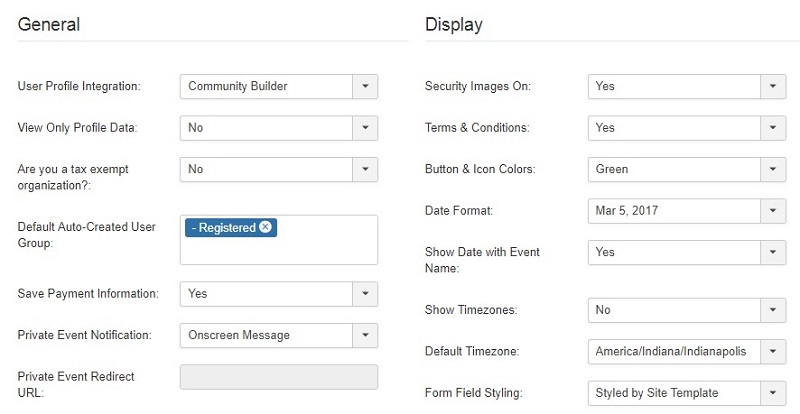
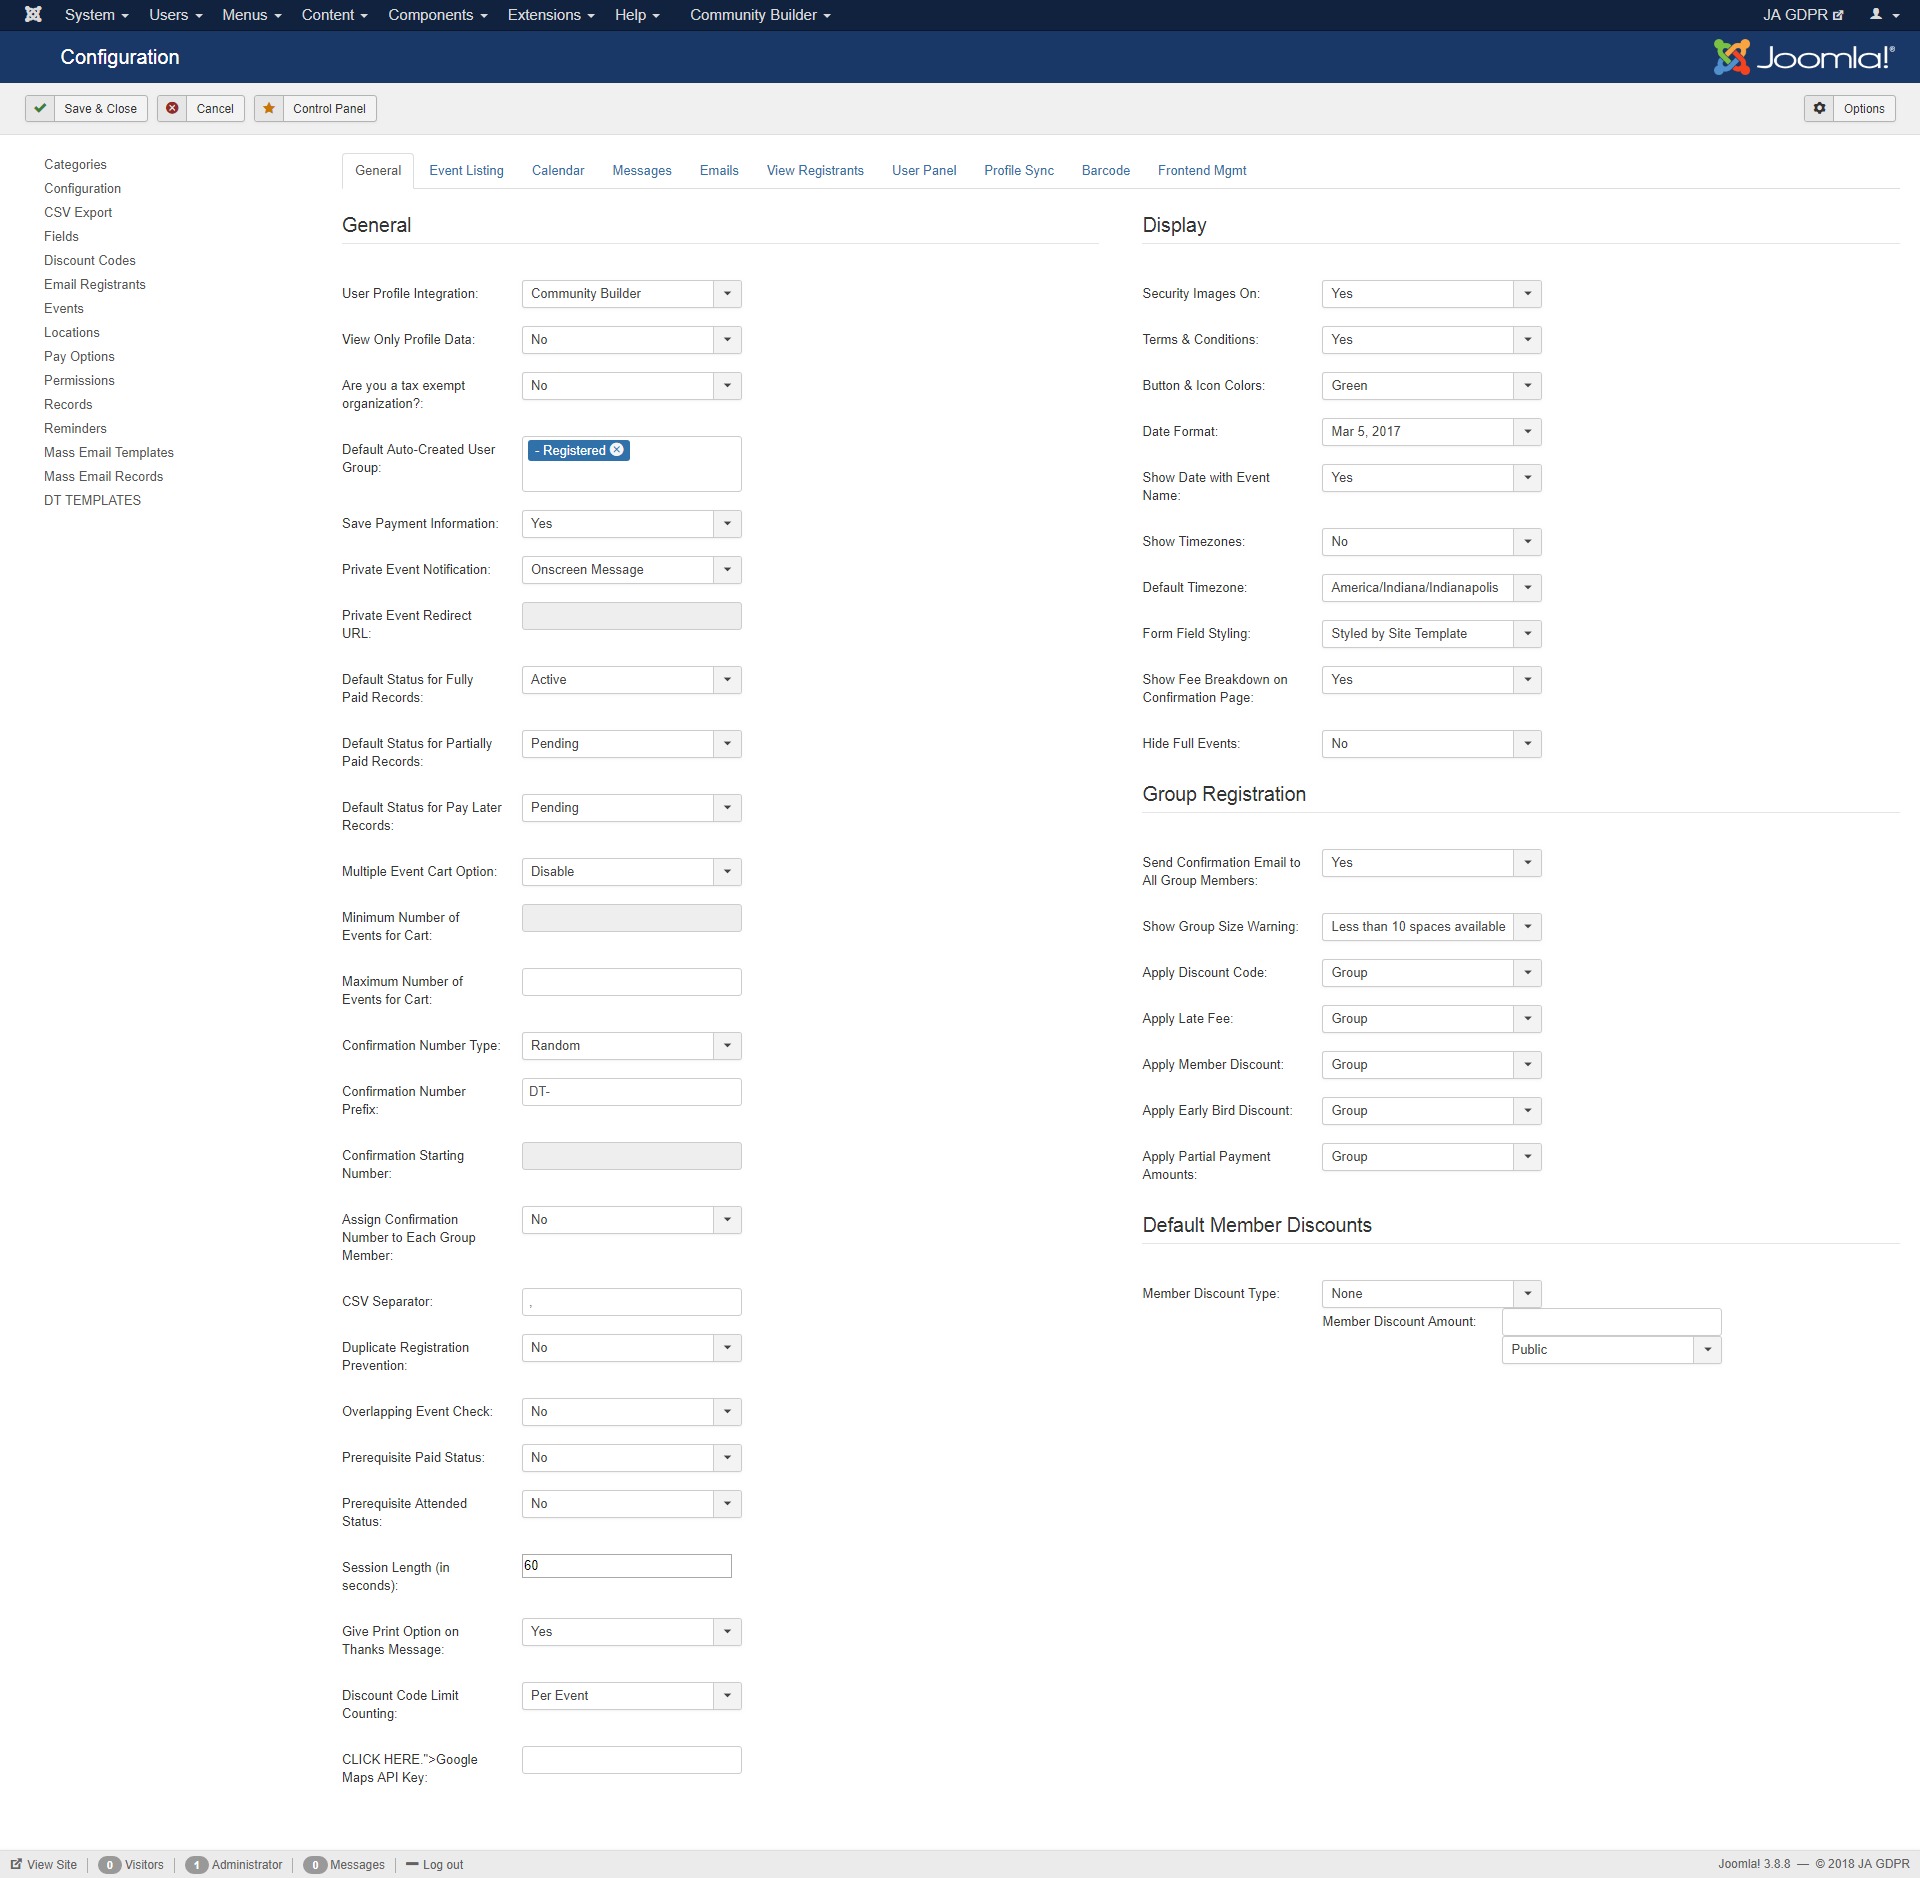
General
General tab contain General, display, group and members discounts confgurations.
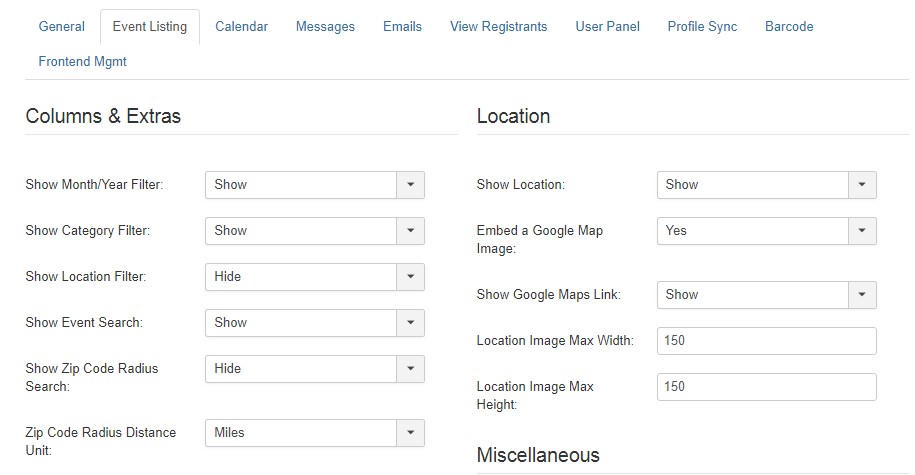
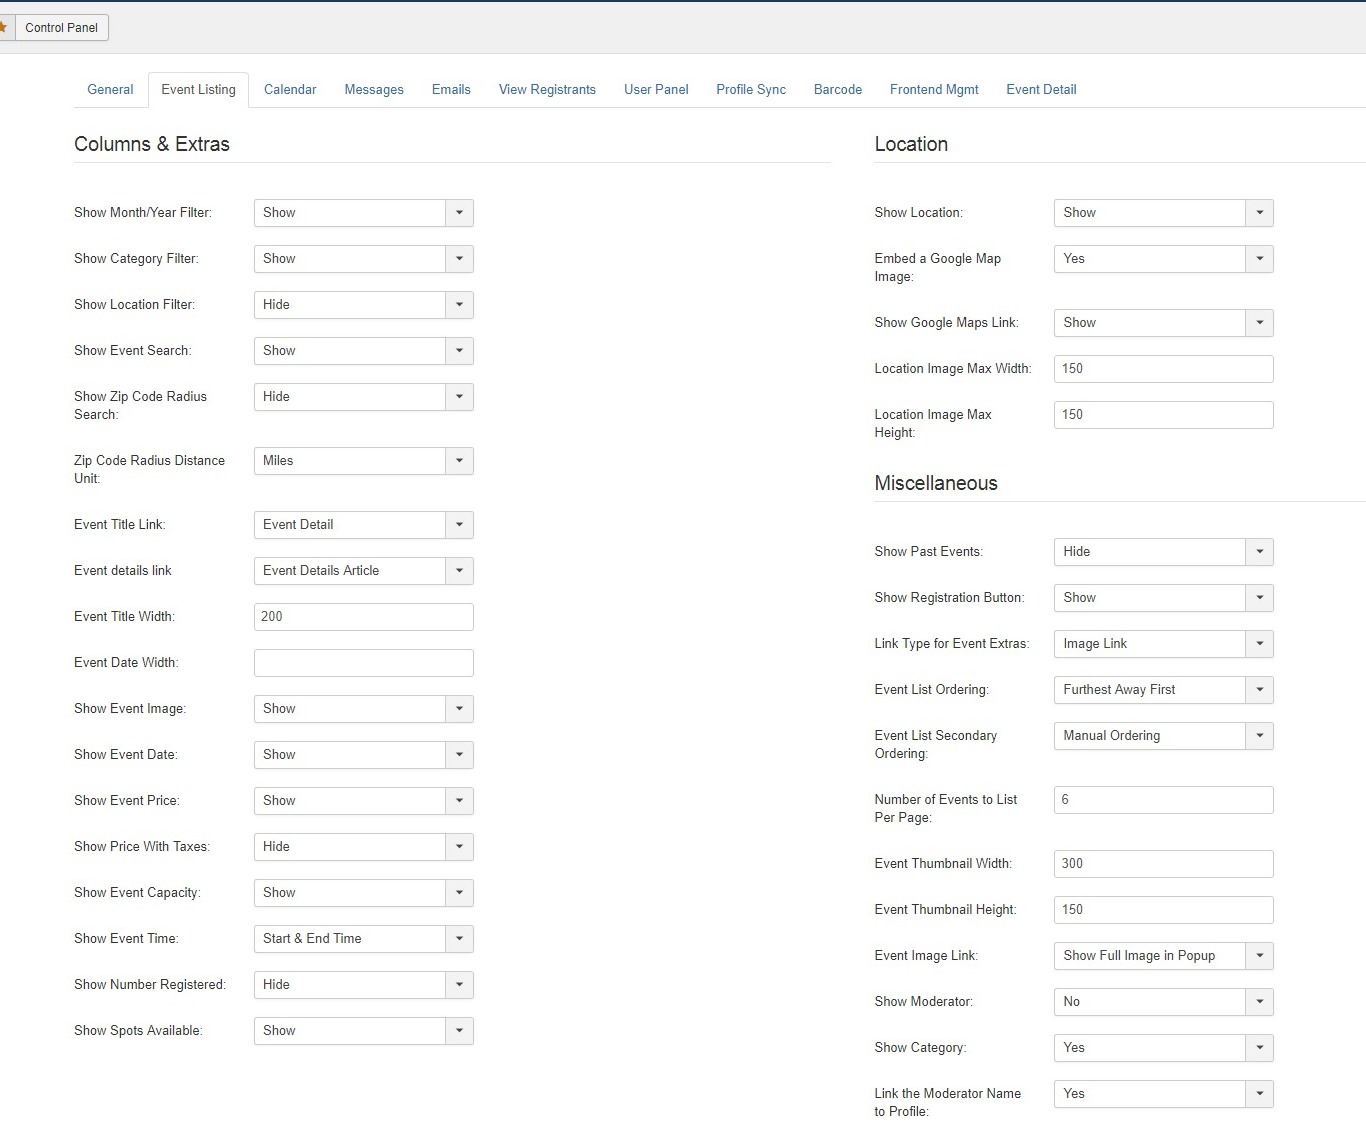
Event Listing
This section help you to configure the Events page layout and informations.
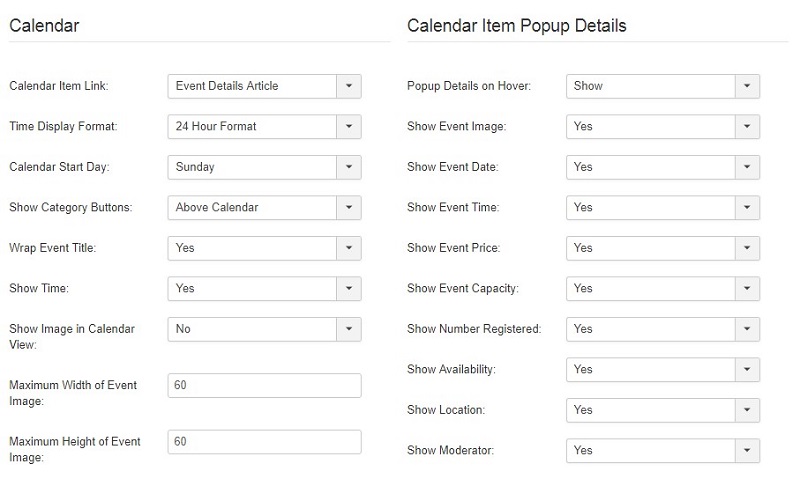
Calender
This section help you to configure the calender setup for events, You can control all the settings via this tab.
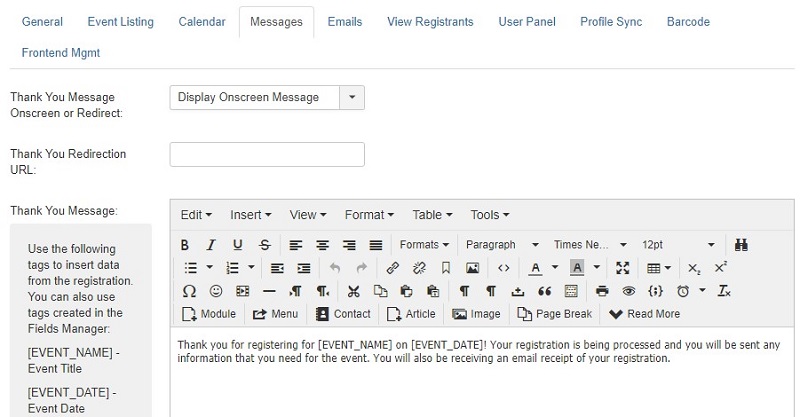
Message
This section help you to configure the message for user that will come after the event registration.This section allow you to add custom message for users with redirect option.
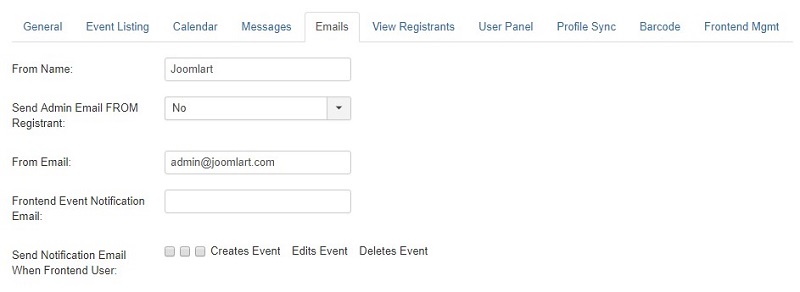
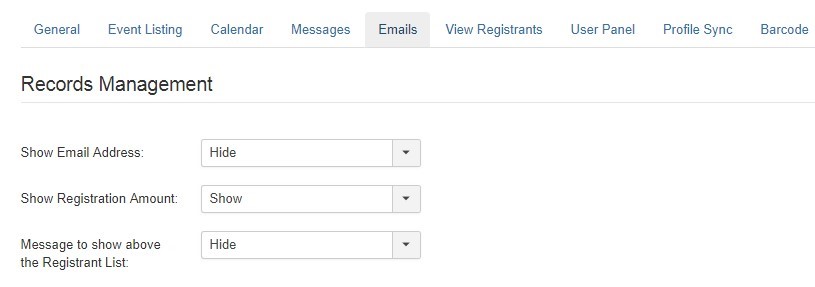
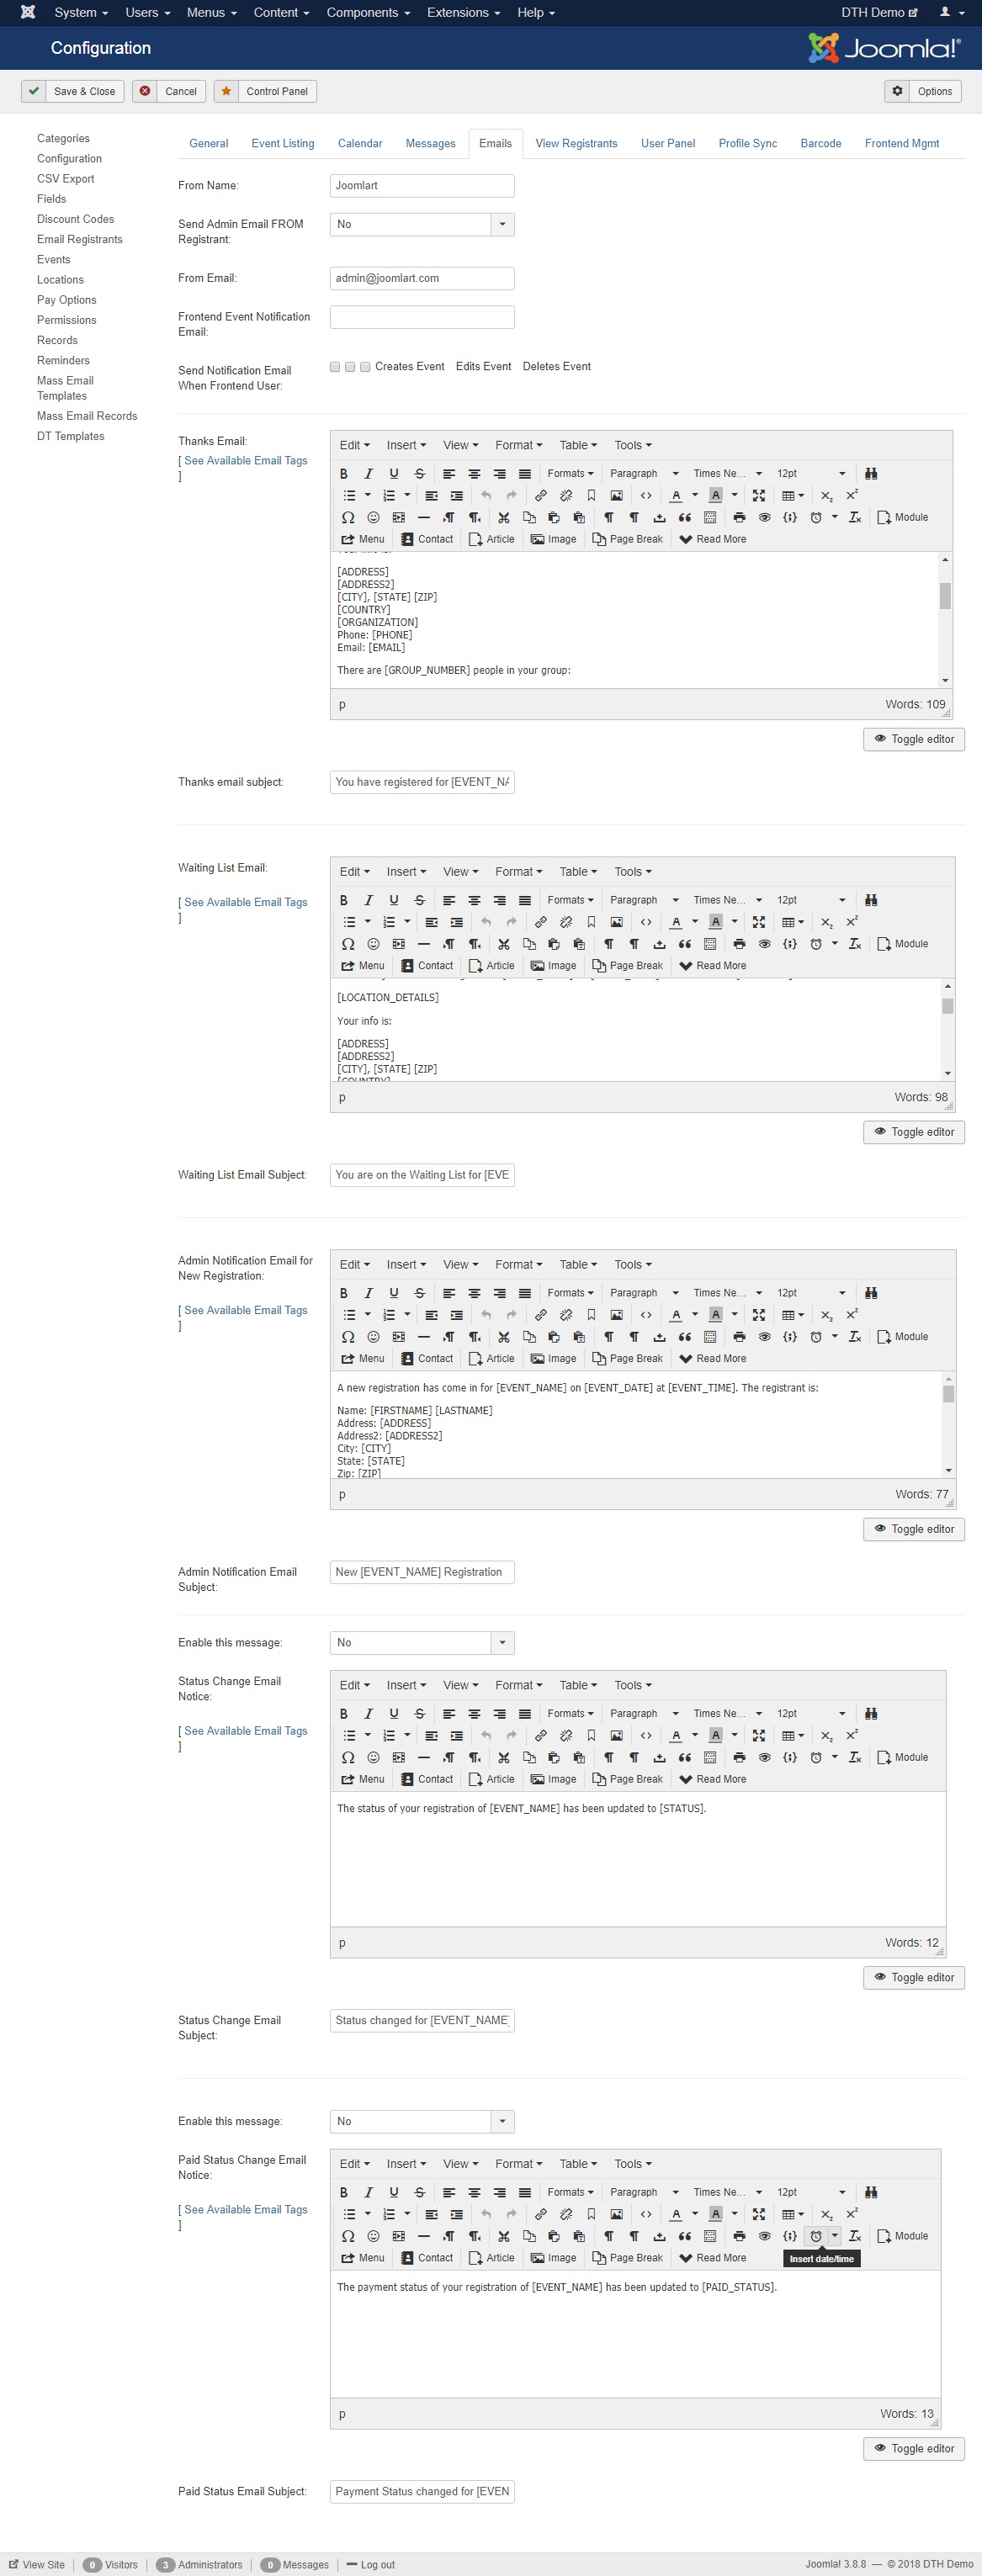
Emails
This section help you to configure the email messages that has been sent to user in form of Thanks email waiting email, new user registration notification, and status change notifications.
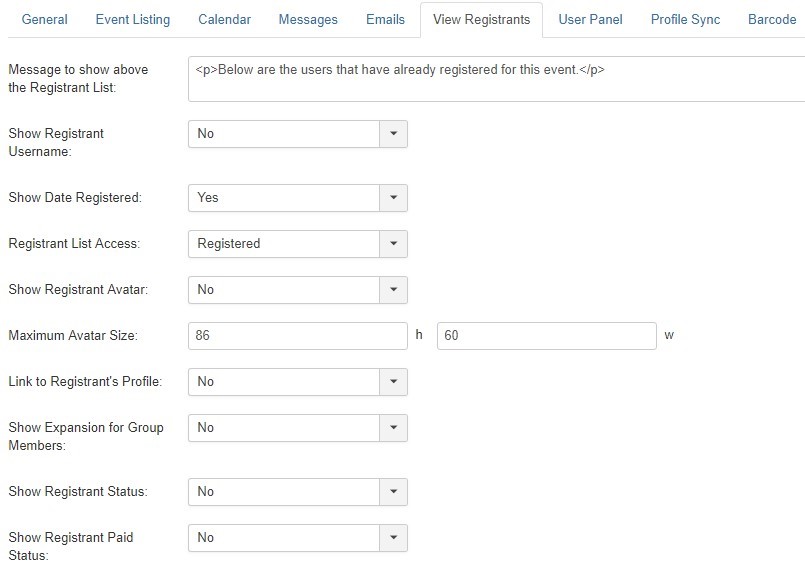
View Registrants
This section help you to configure Regsitrant page view, Allow you to setup the message, name, avatar and group settings.
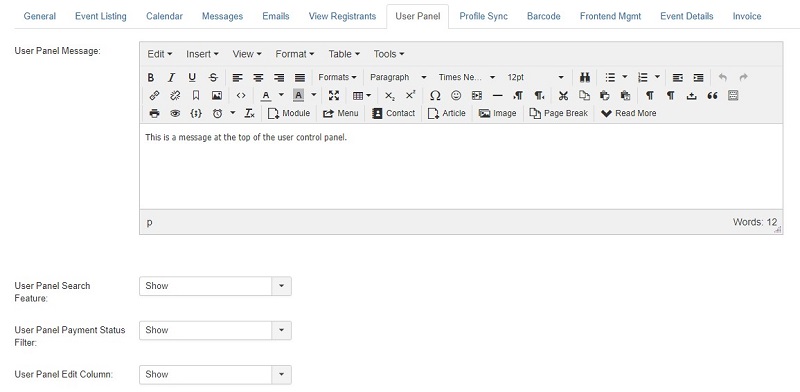
User Panel
This section help you to contro the user panel for amount, search and user panel emails
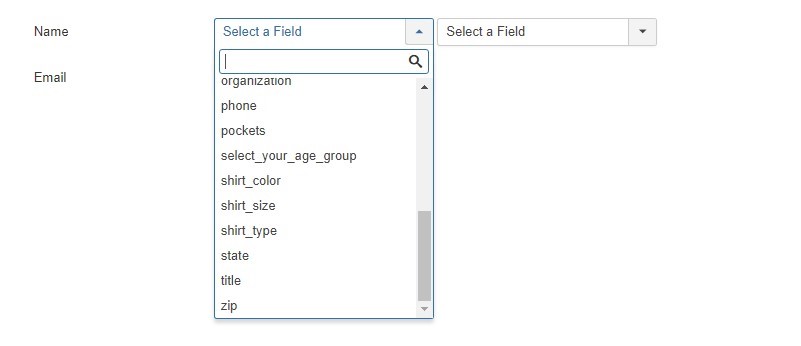
Profile Sync
If you are using Community Builder or JomSocial integration, please use the following field mapping options to select which profile fields should connect to the form fields of DT Register. When you assign the fields, it will allow the event registration form fields to auto-populate with the selected data from a logged in user's profile.
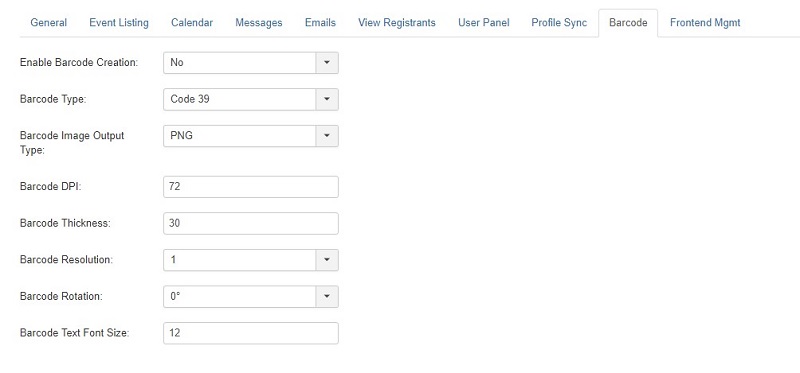
Barcode
This section allow you to enable the barcode option with barcode display settings.
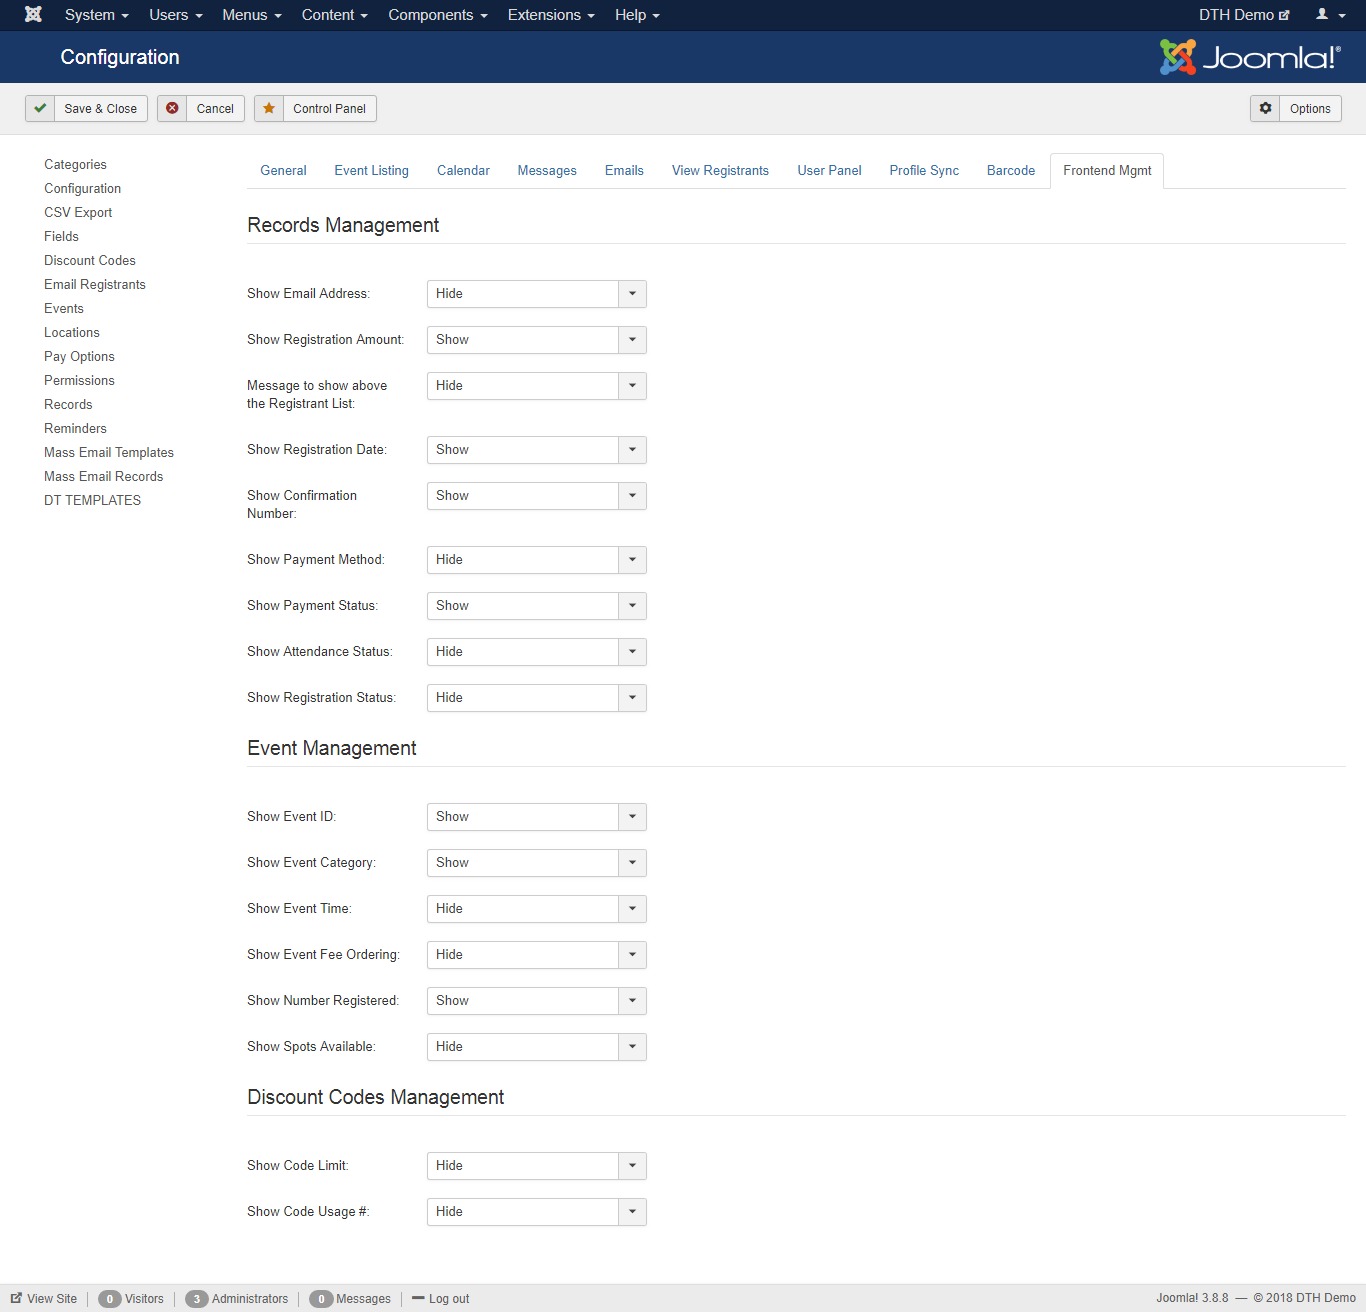
Frontend Management
This section allow you to enable the barcode option with barcode display settings.
CSV Export
In this setion you can export your registration records data. First, please select the event(s) that you want to export data from. After selecting events, click the NEXT button.

Fields
Here you can create and manage fields to use in your registration forms. These fields can be any standard form field type including text input, textarea, radio buttons, checkboxes, date selection, dropdowns, email, uploads and textual (inserted text - not an input field). To create a new field, click the NEW button in the top right corner. To edit an existing field, click the checkbox to the left of the field name, then click the EDIT button in the top right. You can also publish/unpublish, reorder or delete fields.

After your fields are created, go to Event Management and inside of each event you can establish which fields will be used and how to use them.
Discount
This section allow you to create discounts codes for the events, You can create multiple discount code with different options.

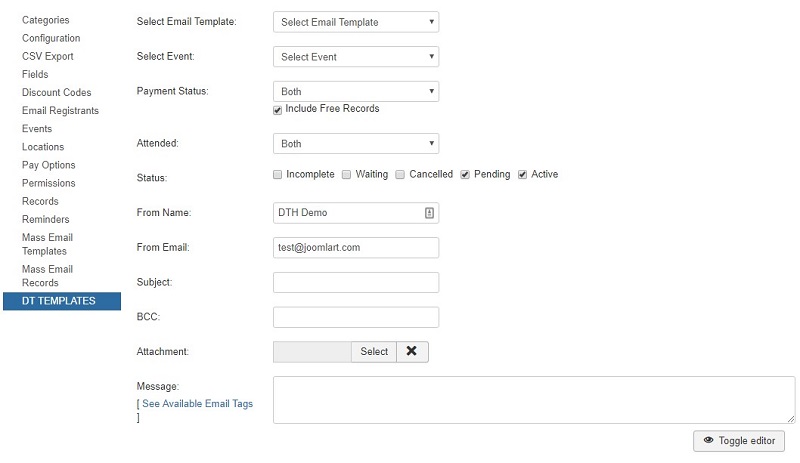
Email Regsitrant
In this section you can send an email message to all of the current registrants of any selected event. Choose an event from the dropdown, create the message and click SEND in the toolbar. You can use the email tags shown on the right to dynamically insert data from registration records.
Events
In this section you can Create and edit the event To add a new event click on Events > New > Add details and save.
In the Event section there are confguration available for General, Discount & Fees, Message, Emails, Fields, User Panel, Agenda, Sponsors and Speakers
General Settings:
In this section you can Add the Event owner, Title setup the location, category of event and Time zone with email settings, This section allow you setup all basic confiugration needed to setup the event.

Discount and Fees:
In this section you can select the payment configurations to setup the payment method and tax settings.
This section also offers the Group registration rates that is optional : Use this section If you want to offer group discounts. You can offer discounts at multiple levels.

Messages:
This section allow you to display the message or instruction on above the registration form for the event. You can also set the short description for the event list page with custom event message setup

Emails:
This section allow you to setup email notification for Thank you email message and Custom admin notifcation email message.

Fields:
In this section all of your fields will show. You select which fields to use for this event and how to use them. Either use the Default settings already established for the field or specify custom settings.

User Panel:
In this section You can configure the cancellation and Refund fee settings

Agenda:
This section allow you add Agenda on the Event page. You can add the Start and end time with title and description.You an add and delete the agenda by click on + - Buttons.
Sponsors:
This section allow you add Sponsors on the Event page. You can add the sponsors name, image, and description.

Speakers:
This section allow you add speakers on event page.You can add speakers name,image and description for multiple speakers.

Event Details:
This section allow you to configure the event details page, You can show hide the event name, price, regsitered users, catrgories, Address etc.
Location Manager
This section allow you to add the location for the event with different location options like Location owner, Address, City, state, zip, Phone, latitude and longitude

Pay Options
This section allow you to add to set different payment option for events

Permission
This section allow you to add to set different permission level for user. There two condiotion should be followed:
- Super Users should NOT have "Edit Own Items Only" checked in almost all cases.
- Your Super User account should be assigned ONLY to the Joomla Super User group. Being assigned to other groups is not necessary and will cause issues with permissions here. If user group assignment changes are needed, once saved, you will have to logout and login again for the changes to be applied.

Records
This section allow you to see records of events with different options.
Below are the avaialbe options:
- Use the "Select Event" dropdown filter above to show records from only a specific event.
- To see records of failed Authorize.net registration attempts due to failed payments, select "Yes" on the "Show Failed Attempts" dropdown filter above.
- To add new records manually, click either "Group Registration" or "Individual Registration" in the top right after first selecting an event in the dropdown.
- To sort the records, click the column title. Click it again to re-sort the opposite direction.

Reminders
In this section you can create reminder emails that will be automatically sent to registrants of your events. The emails will be sent based on the number of days you set prior to the start date of the event. For this to work, you must create a CRON JOB on your web hosting account. You can set the cron job to run at whatever time you desire and how often you desire. The Cron Command must be set as seen below.
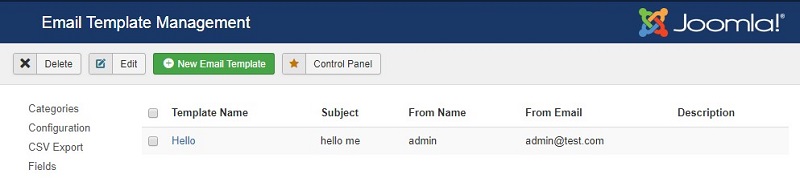
Mass Email templates
This section allow you to create new custom email templats. You can create different templates with avaialble email tags.
Mass Email Records
This section allow you to edit the Email records.
Themes
This section allow Upload new templates for DT Regsiter.The template as used to give a new style for the DT Regsiter component on frontend

Invoices
This section is new in DT Regsiter that show all invoice of users. In this section you can open the single invoice and edit the details. Invoice contains all the users details like Invoice no, First name, last name, Event title, Email and ontacts etc

When you edit and save the Invoices there is an option for the downloads, that allow you to download the invoice file on your system.

Upgrading from DT Register 3.0.0 or later (already in Joomla 3.x)
- Step 1Backup your files and database just in case you experience any problems during or after the upgrade.
- Step 2Download a copy of any CSS files, modified images, and the two language files IF you have made any changes to any of these files. If you haven't made changes, skip this step.
- Step 3Install the new version of DT Register for Joomla 3.x. You DO NOT have to uninstall the previous version first. Your records, events, configuration, etc will NOT be removed. Files are replaced but all data is left alone. This is actually the case whether you uninstall/reinstall, or if you simply install over top of the previous version. Just make sure you use the Joomla installer and NOT just manually replace files.
- Step 4IF you have changes in any CSS file or images, you can re-apply them to the new package installation. You can reload your backed up file, but you should always double-check to see if any changes were made in the updated version. You don't want to wipe out needed changes that may have been applied. Many changes were made with CSS in version 3.2.0 so be sure to use the new CSS files... not replace them.
- Step 5IF you have changes in your language files, DO NOT reload them to your new installation. There will be new language items that you will need. You will find two language files for DT Register... one for the frontend and one for the backend (administrator area).
These files are located at:
/language/en-GB/en-GB.com_dtregister.ini/administrator/language/en-GB/en-GB.com_dtregister.ini
- Step 6Now, you need to go to the DT Register -> Configuration, set all new parameters and SAVE.
- Step 7Go to DT Register -> Permissions. Make sure all items are enabled for Super User except for the first box "Edit Own Items Only". Save. You should be all set now!
Additional upgrade tasks
If upgrading from a version prior to 3.0.9, you'll need to open and re-save DT Register Permissions.
IMPORTANT NOTE: The 3.0.9 release (and later) of DT Register is intended for Joomla 3.3 and later. So, you MUST upgrade Joomla FIRST to 3.3.x before moving to DT Register 3.0.9 or later
If upgrading from a version prior to 3.0.8, you'll need to open and re-save any event that uses conditional fields. There is a new toggle on the fields tab within an event edit page that allows conditional fields to now be shown (and controlled) per event! So make sure each conditional field is enabled for the event as needed, then re-save. Changes were also included to the main.css file for this release so be sure to use the current CSS file.
If upgrading from a version prior to 3.0.5, you'll find the Configuration area (on event listing tab) now has a Primary Ordering and Secondary Ordering. A hard-coded primary ordering by category is no longer forced. Set ordering as desired and re-save configuration. Also, if you do not re-save configuration, your date formatting will not look right due to date config changes in this release.
If upgrading from a version prior to 3.0.3, you'll need to open and re-save all DT Register categories. Make sure the access level is set appropriately... and note that the Joomla access level "Guest" is NOT the same as "Public".
Having installation problems?
Some users experience installation problems due to more restrictive server settings. If you are having no luck getting the install to work, the first thing to check is your PHP setting for upload_max_filesize. This must be larger than 2M as DT Register is a larger package than the average extension. You can check this in the System Info area of Joomla!. If for some reason you are unable to get this setting increased, you can use the Upload From Directory option.
Can't save configuration?
If you are having problems saving the main DT Register configuration, it's because something is missing that is required. Check the Emails tab (which is probably bright red) and make sure "From Name" and "From Email" are configured.
Migrating from Joomla 1.5/2.5 to 3.x
If you are migrating from Joomla 1.5 or 2.5 to 3.x, you must first make sure you have upgraded DT Register in 1.5/2.5 to the latest version for that series. BACKUP ALL FILES AND DATA first before you do anything!!! If you migrate to 3.x with an older version of DT Register in place, you WILL have issues. Be aware that you do not UPGRADE to 3.x, you MIGRATE... meaning you build a separate site, then move your 1.5/2.5 data into the newly setup site.
Follow these steps exactly:
- Step 1Upgrade DT Register to the latest version within Joomla 1.5/2.5.
- Step 2Export all DT Register database tables from your 1.5/2.5 site database. These tables will all begin with "jos_dtregister". Your site may use a different prefix than "jos_" so be aware of that.
- Step 3Setup your 3.x Joomla site and run a migration tool to pull in all Joomla users, articles, and other core Joomla items from the 1.5/2.5 site. There are many tutorials you can find with a quick Google search for this.
- Step 4Once the 3.x site is ready with core data, go to the new database and import your 1.5/2.5 data for DT Register that you previously exported. As your new database probably has a new database prefix, you'll need to make that change to your imported DT Register database tables.
- Step 5NOW, install the DT Register component using the 3.x version. This will load the files and make any necessary updates to your data. All of your previous configuration, events, records, etc will be there.
- Step 6Go to
DT Register -> Permissions.FIRST, click"Sync Groups".This will sync your Joomla User Groups with the DT Register Permissions matrix. Then set permissions as desired. Make sure super user has all boxes checked except for the first one,"Edit Own Items Only". - Step 7Open each of your DT Register categories, set the access level and re-save them.
- Step 8Open each of your Pay Options, set an owner and global status where desired and re-save each of them.
- Step 9Open Configuration, set any parameters as desired that you did not already have in 1.5/2.5. Save.
- Step 10Install and enable all of the DT Register plugins and modules that you NEED. See the readme file in the package for explanations of each one. Do not just blindly install them all. Determine what you need and load those items.
There are many CSS changes from 1.5/2.5 so be sure to use the new files and update them as needed. The language files are completely reformatted from 1.5 to 3.x so you can NOT use your old language files. You'll have to re-apply changes to the new files. Format from 2.5 to 3.x is the same, but there are many changes to be aware of in DT Register language tags.
If you need to upgrade your 1.5/2.5 site to current version prior to the big migration, see the appropriate folder within the DT Register package. You'll find the install package and a separate readme.txt file that gives detailed upgrade instructions.
Optional JEvents Sync info
The JEvents calendar component is NOT required for DT Register usage. There is an optional sync between DT Register and JEvents. To use this, you must have JEvents 2.0.x or later. See our videos for more info. Again, this is OPTIONAL. If you want to remove the sync between JEvents and your existing events, go to the DT Register control panel and click the "Remove JEvents Sync" button.
Paypal Instructions
If you are using PayPal payments, you must have Instant Payment Notification (IPN) enabled in your PayPal account for registration records to be created properly in DT Register. To do this, login to your PayPal account and go to Edit Profile. Under the "Selling Preferences" column, click on "Instant Payment Notification Preferences". The next screen will show if this is On or Off. To turn it On, click the EDIT button. Then check the checkbox and then input a url in the Notification URL box. DT Register actually has the necessary URL coded in, so it doesn't matter what url is input here. If nothing is there, just type in your website URL including the http:// on the front. Click SAVE and you're all set!
Additional items
- mod_dt_upcoming_event3_7.zip(included in main package install)
This is a module that shows the upcoming X number of events that are setup in DT Register for registration. You can configure this to link to JEvents details, to the assigned "Details Article" or directly to registration forms. You can also choose to include data from the event such as category, location and price.
- mod_dt_calendar3_4.zip(included in main package install)
This is a module that shows the optional Mini Calendar. It can be set to link to events on a selected date in either a list or calendar view.
- mod_dt_cart3_5.zip (included in main package install)
This is a module that shows the optional DT Cart. If you are using multiple event registration (cart system), then you should install and enable this module. Otherwise, you don't need it.
- mod_dtsearch3_3.zip (included in main package install)
This is a module that gives an advanced search for your events within a module position. You can filter your search results by category, location and/or moderator as well as with a zip code radius search.
- plg_dteventlink3_2_2_J3x.zip (included in main package install)
This is a Plugin that serves a two-fold purpose. One, it enables you to add a "Register Now!" link in an article or wherever else you would like. By inserting a tag in the format {dtregister}event_id{/dtregister} it will embed the link to the event's registration forms. Two, if you set your event to include a details link, you can associate a content article with the event for showing further details. This plugin will automatically add the registration link at the bottom of the article. In both cases, the link can be configured to be an image or text link. Also, when syncing with JEvents, this plugin will add a Register button in the calendar details view. See our forum for a sticky post giving more detailed instructions for this plugin.
- plg_dtcache3_0.zip (included in main package install)
This plugin is REQUIRED and will be enabled automatically on install. Due to changes in Joomla cache handling, this plugin was needed as Joomla was able to cache DT Register pages even when cache was disabled in the global configuration. Cache should not be used with a complex system like DT Register, so this plugin makes sure that no potential cache issues can affect the registration session, calculations or anything else.
- plg_dtreg1_0_J3x.zip (included in main package install)
This plugin is REQUIRED and allows for improved functionality of selecting images and email attachments in event and location setups. This plugin must be installed AND enabled.
- plg_installer_dtregister1_0_J3x.zip (included in main package install)
This plugin is REQUIRED and is part of the Joomla auto update process added with DT Register 3.2.0.
- plg_dtregister_ssl1_8.zip
This plugin is optional. If you install and enable this plugin, all DT Register links will be secure using a https. Then when you leave DT Register and go to any other part of your site, it will return to a non-secure http link, unless you specify in the parameters other components to ignore so their own SSL settings will be applied.
- plg_jeventupdate3_2.zip
This is a plugin that should only be installed if you are running JEvents and syncing DT Register and JEvents together still. After installing the plugin, be sure to enable it. There are no parameters to set. The purpose of this plugin is when you update the event title, date or time in JEvents, it will update the synced event in DT Register.
- cbplug_dtregister_records2_0_9.zip
This is a Community Builder plugin, NOT a Joomla plugin. It adds a profile tab showing the registration history of a user. This version of the plugin is for CB 1.4.x or later.
To install it, go toComponents -> Community Builder -> Plugins - plg_jomsocial_dtreg_records1_11.zip
This is a JomSocial plugin and is optional. It should only be installed if you have the JomSocial component in use on your site. It adds a profile tab showing the registration history of a user. This version of the plugin is for JomSocial 1.8 or later. Install this plugin in the regular Joomla installation area. Don't forget to ENABLE it after you install. There are also some parameters to be set in the plugin.
DO NOT INSTALL THIS PLUGIN IF YOU ARE NOT USING JOMSOCIAL - plg_jomsocial_dtreg_activity1_8.zip
This is a JomSocial plugin and is optional. It should only be installed if you have the JomSocial component in use on your site. It adds all registration actions to the JomSocial activity feed, similar to Facebook status messages. This version of the plugin is for JomSocial 1.8 or later. Install this plugin in the regular Joomla installation area. Don't forget to ENABLE it after you install. There are no parameters to be set in the plugin.
DO NOT INSTALL THIS PLUGIN IF YOU ARE NOT USING JOMSOCIAL - dtregister_falang.zip
This is a package of five Falang 1.1.x content element xml files. If you are using Falang in a multi-language website, then you will want to load this package. Go to the Falang Content Elements area in the backend, click Install, then load this zip file. It will install all five content elements, which will allow you to translate all configuration messages, category names, event details, custom fields and location names. If you do not use Falang, then ignore this file... you won't need it. It does NOT install as a Joomla extension.
Other Languages
Currently, frontend and backend translations are available for: English, Dutch, French, German and Portuguese. Then there are translations available for frontend only:
Arabic, Czech, Dutch, English, Finnish, French, German, Italian, Portuguese, Spanish, Swedish.
For any of these language directories that exist in your Joomla installation, the corresponding DT Register language file will automatically be loaded when you install the component. More translations are always being added.
For instructions on using any of these DT Register add-on items, please see the DT Register area of our forum as well as our support manual and video tutorials.


